Now that I have been using the big four jaw chuck on the lathe I have to indicate everything. Looking through my selection on dial indicators I pulled a few likely looking ones out that I thought might would cover most of the four jaw needs. One thing is apparent right away that you need some range to the indicator. Just eyeballing things you can get within say .020 runout which is a .040 TIR (total indicator reading). The indicator needs a range that can accommodate this level of initial runout. I have a Blake Co-Ax that was rebuilt that I have been wanting to try. It seems to work well but I only have two styluses for it right now. The round shank makes it more of a hassle to mount in a tool holder also unless you use a boring holder with the vee groove. More on the Blake testing later.
What ever indicator you end up using it needs to mount to the machine quickly. For four jaw work its helpful if the tip lands on the center line in the vertical axis without having to look. If I was independently wealthy I would just dedicate an Aloris holder to the indicator setup and be done with it. At eighty five bucks a pop for a boring and facing holder it will be a some time before there is any excess. Looks like I will be moving tools around for a while. I suppose one could make their own holders if one wanted to. Great idea lets hit the shop. A quick scrounge around the metal rack yields a find of some likely looking cold rolled flat bars.
One thing with a holder that will be dedicated to an indicator setup is that it will never see any serious load or cutting forces. We could make it out of plastic or even a sturdy wood and it would be fine for holding an indicator. Well I'm tired of woodworking this week so its going to be metal today. Like most things around here it all starts with a sketch.
Not much material required to build this skeletonized holder. Two flat bars and a couple of pieces of 1/2 diameter round bar.
Doesn't look like much right now but it comes together quickly. The pieces have all been milled to length and squared up to make the welding and rod spacing easier.
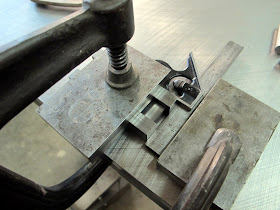
Getting things lined up and square to one another. The top plate under the c-clamp is special. For this to work properly the rounds have to be spaced accurately so the wedge of the tool post will clamp the holder.
This is the rod spacing fixture. I determined the correct spacing by adjusting the tool post on a standard Aloris holder until I could just barely pull it out of the tool post. I then put the two half inch diameter rods in the dovetails of the tool post and measured over the rods. The little step at the top is so the sides where the rods will lay stays square to the top of the holder when it all gets clamped up for welding.
Here you can see the welding fixture in action. If I measured everything right the rods should be at the correct spacing so the tool post will clamp on properly.
A few tacks and time to test it in the tool post. The tool post can exert huge wedging forces so I just want to gently see it my measurements are close to the desired fit.
Gingerly trying it out in the tool post. Looks like the right dimension.
Some nice hot TIG welds to hold it all together. There was actually some room between the inside of the rods and the tool post that I could have welded the inside also. It was pretty close, so instead of going for it and then cussing up a storm when some weld metal interfered I decided to skip the inside weld. This is the kind of stuff you learn the hard way. I've screwed up enough times to recognize a bear trap when I see it.
Check your set screw inventory before you tap the holes in the holder. Looks like I had 3/8 set screws in stock.
I thought about doing the holes before welding. The problem with that is there isn't much extra material in the holder to start with. For welding its best to weld when you have maximum material to act as a heat sink and provide some strength to resist the inevitable distortion forces from the welding. It was easy enough to do after the welding so it really wasn't a major factor.
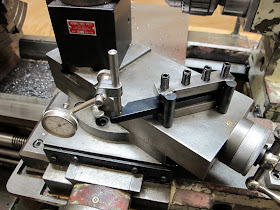
Ready to try out. The set screws I had were kind of long so it looks weird right now. I'll get some shorter ones next time I make a McMaster order. This is the indicator I have been liking for four jaw work. Its a Starrett back plunger with .200 range. I may mill a centering groove in the bottom jaw so I can continue the Blake testing with this new skeleton holder.
One thing I decided to skip was the height adjustment screw that comes on the stock Aloris holders. For this holder I wanted to be able to move it up or down without fussing around. I set the center height so when the holder is all the way bottomed out the indicator plunger is on centerline. It feels strange to pick it up. The skeleton holder is so much lighter than the regular Aloris holders.
An interesting exercise that has got me thinking about how I might make my own holders from scratch. In the long run probably not much savings but it might be worth while for a larger run.


An interesting exercise that has got me thinking about how I might make my own holders from scratch. In the long run probably not much savings but it might be worth while for a larger run.
ReplyDelete4pcs velvet bed sheet
velvet bedsheet for winter