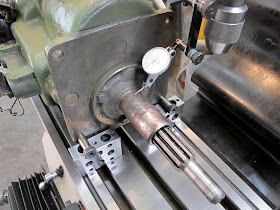
The local metalworking elves left a surprise in the shop for me. When I got home I was greeted with this sight waiting in the machine shop.
A three speed transmission with no legs managed to paddle itself into the shop next to the mill. I guess its waiting for me to give it a boost onto the mill. My Studebaker neighbor figured out that this particular transmission wouldn't fit after several hours of laying on the dock under the car trying to wrestle it in. My work scheduler spouse suited up and went down the way to offer some help when she saw him struggling to get the thing installed. Several floor jacking sessions and dashes to the tool room and no joy. All that work for naught when they discovered the new transmission had missed the drill and tap operation on the assembly line. Oops.
My neighbor Sam just wanted to make a paper rubbing of the correct holes to add to the new casting. My wife shoved him aside and took charge and got some proper accurate measurements and even made a nice sketch. Sam was worried telling my handler that I might be too busy to do this for him. My wife assured him that was not the case and I could do this no problem. Guess what I'm working on Saturday?
The actual job is easy, but the setup is not something you do every day unless you work at AAMCO transmissions. There are Two 3/8-16 tapped holes needed for the transmission to mount to the cross member. This is a good old American car with all inch threads and materials. The drilling and tapping will only take a few minutes but the setup will take a little longer to do properly. I could just lay it out with a combination square and drill it but then It wouldn't make as good an article.
I'm glad its just a wee baby three speed instead of a sixteen speed road ranger out of a dump truck. Unfortunately my jib crane doesn't quite make it over the mill.
My first break was the mounting pattern was square. Two half inch shoulder bolts fit the mounting holes pretty tightly so I set up one end of the transmission off these pins.
On the opposite end I put on a Starrett jack screw so I could adjust the tilt of the transmission easily while watching the indicator.
First off I just got things within the range of the test indicator. This saves time when you know your pretty far out. I like to use the most foolproof tool and work my way finer as the accuracy needs go up.
I did the initial leveling by indicating across the input sleeve. The Starrett jack screw was adjusted until this was parallel with the machine.
After getting things pretty close I added some light clamping to hold things in place. Now the more precise alignment can be done. Traversing the indicator across the face aligns the mounting face parallel with the machine Y axis.
Traversing the face vertically with the quill aligns the mounting face perpendicular with the machine table.
I took a few minutes going back and forth to get both directions to null. One thing I almost did because the machining on the mounting face was rough was to clamp a ground parallel to the rough machined face to average the humps and bumps and give me a smooth surface to indicate on. This trick works well aligning the vise on a milling machine when the vise jaws are beat up. The parallel spans the dips and wows and speeds the indicating by averaging.
The last thing once the transmission was aligned with the machine axes was to pick up an accurate centerline. I decided to not use the typical edge finder for doing this. In the picture I have interrogated the shaft vertically to find the center. The indicator is then swept to find the largest distance and then zeroed. Vertical and horizontal are then checked to see if they both read zero at the same time. At that point I zero the DRO and do the same thing on the opposite side of the shaft.
Once I'm happy with the indicator reading I read the distance off the DRO and divide by two to find the center dimension. You can see the number in Sharpie written on the table. The less I try to remember the better.
After all that I'm finally ready to drill the holes. Two tiny spot marks to do a final bozo check. I use my most bozo proof tool to make sure I did the math in my head correctly.
Not too deep. Don't need another job plugging the bottom of a small hole. Better to use some shorter screws than strike oil.
No broken taps and no oil leaks. This job is looking like a thumbs up. I'll leave it on the machine for a while in case Sam wants me to dust off the mounting surface flat and parallel. A fun setup job in the mill on a Saturday morning.
Thanks for looking.


No comments:
Post a Comment