Tuesday, January 29, 2013

Probe Lifting Bracket

One of the physicists at work approached me with a problem recently. At first it looked like some kind of hoisting problem requiring  lots of oversight and engineering approvals. As it turns out once we discussed all the details its really an ergonomic problem. I'll describe the problem we are trying to solve.

The scientist has to test many samples of superconducting wire. Each batch of new wire requires a battery of tests and measurements to determine the allowable design parameters for fabricating larger magnets using the same wire. These samples are tested at liquid helium temperatures which is around 4 Kelvin (-452 F). The structure that supports the wire during the test is called a probe. If we just took the room temperature probe +452 Kelvin and dropped it into a cryostat full of liquid helium most or all of the liquid helium would turn to gas and be lost to the atmosphere because of the large differential temperature.

To minimize the liquid helium loss we pre-cool the probe structure in liquid nitrogen first to take as much heat out of the probe before it is inserted into the liquid helium. Nitrogen is cheap compared to helium and has a much lower thermal conductivity than helium. Not much nitrogen boils off as gas when a room temperature probe is inserted into a bath of LN (liquid Nitrogen). This pre-cooling gets us down to around 70 degrees Kelvin. Pretty close but not close enough for the wire to become a superconductor.
So the ergonomic problem we are trying to find a workable solution to is the insertion of the pre-cooled probe pictured above into the cryostat containing the liquid helium. In the past one of the technicians would manually lift the probe (~30-40 lbs) and walk up a step ladder carrying the cooled probe out in front of his body, and insert the probe slowly into the liquid helium filled cryostat. To compound the problem as the probe is lowered into the helium we pause every few inches to allow the probe to cool off so we don't lose too much of our expensive helium.
Here is Paul inserting a pre-cooled probe into a cryostat containing liquid helium. You can see the volume of gas coming out of the cryostat as he inserts the probe. This is going from 70 Kelvin to 4 Kelvin. You can get the idea what would happen if we didn't pre-cool.

After kicking around some ideas we came up with a couple of plans. The first was a bit agricultural and consisted of a small self locking block and tackle to support the weight of the probe but still allow the technician to manipulate it easily. This idea had the advantage of expediency and low cost but with less control than we needed.
 The second idea was more involved but a better overall solution. Using a small hand crank shop crane we can extract the probe from the LN pre-cool and then lift the probe and swing it over and lower it in a controlled manner into the helium bath. We have a few of these hoists around that are used to mount large lathe chucks. The models dedicated to the lathes have a block on the bottom that clamps right into an Aloris tool post. Our only problem was we didn't have one like the one in the image with a long vertical tube. All the models we had on hand were the shorty versions of the one above and we need the vertical height for the probe. A few weeks ago I was looking for a box to ship something and I went into a shipping room in another building. Low and behold there was one of the shop cranes we are looking at for our problem with a long vertical tube. I asked If we could borrow it for a test and hauled it back to our building.

Like all good stories this one started off with a minor thud. I bought four inch square aluminum to make the mounting bracket. I figured it was easier to make a smaller square out of a larger square than make a round bar square from scratch. Since I have become a four jaw chuck enthusiast I decided to use the four jaw on the LeBlond lathe in our support shop. There was a four jaw and it looked like most four jaws in most shops. Hardly ever used. No problem. A little cleaning and it will be ready to go. Hey, where is the chuck key for this? Problem number one. So we tear the shop apart looking for the chuck key without joy. I call one of the machinery repair guys and ask if they have a drawer of old chuck keys hiding in their building. No joy again. To Johnnies credit he offered me the chuck key off their lathe as a loaner. Thanks Johnnie.

I finally found one in another building that didn't have a chuck to go with it. I was one click away from ordering another one but decided to check one more place. So now I think I'm ready to go. Opps, chuck key is the wrong size. I had quickly scaled the socket and it looked like half inch. Turns out a bit too quick with the scale. The socket is a seven sixteenths square key. Dang.
 No other quick options than mill the existing chuck key down to fit. Tak took pity on me and milled it for me after hearing me whining about it. When we measured the square socket on the chuck we must have picked the smallest one. After milling all four sides of the chuck key it only fit one of the four sockets. As you can see this simple job is headed downhill pretty fast. Fortunately Tak was able to touch up the sides and corners on the chuck key and get it to fit. Phew, nothing has been done on the actual job yet. This is all prep work.
 The corners were the hangup. If you look at the female socket they have rounded corners. I guess their broach was wearing out when they did this chuck. Once Tak rounded the corners all was good.
Finally I get to make some chips. Four jaws hold like the dickens so I could make up some time once I got the darn blank in the machine.
 Around 600 rpm and .015/rev feed. With 6061 you need to feed aggressively to get the chips to break.
Ready for boring now. 2.560 diameter  x 5.00 deep. Flat bottom to make it more interesting.
I didn't get any pictures of the bore roughing. Since it was deep I stepped the bore out in phases. What I mean is I bored steps to increase the amount of room for chips to come out. For example I drilled a pilot hole large enough for the boring bar to very close to the finish depth. Then I hogged out to a depth of around three inches but increased the diameter to almost two inches before I went any deeper. This allows the chip that are formed deep in the bore a place to go that isn't jammed around the boring bar. You can feed more agressively and use a larger depth of cut with this stepping method. All the material needs to come out so you might as well make it come out smoothly. No rules that you need to keep the bore parallel during roughing.
Finished bore. I couldn't get the camera to focus on the bottom of the bore.For the final cuts I used .005/Rev feed for a smooth finish.
I switched back to the normal six jaw we keep on this machine to do the backside diameter. Face to length then turn up to another shoulder to create the mounting bracket blank.
Finished on the lathe for now. Yes I forgot a dimension on the drawing and had to pencil it in. Most of the mill work was normal operations. The large corner chamfer is of some interest.
The chamfer was not particularly precision so I just used an angle plate clamped to the vise jaw to set the square part at a 45 degree angle. To measure the chamfer I just zeroed the tool on the diameter of the cylindrical part and moved up the required amount. It was an additional dimension that needed to be added to the drawing but easy to extract from the model.
I had Matt, one of the new trainee's help with the drilling and tapping of the block that the bracket will attach to. This is the actual very first job he has ever done on a Bridgeport mill. That's part of the reason I took a few pictures of him on the machine. I wish I had a picture like this from when I first ran a mill. It would probably be printed on stone tablets.....
The mounting block that Matt modified back in position on the cryostat ready for the new bracket.
Looks like the computer model at least. Hope the hoist fits in the hole.
This is the hoist we borrowed from the other shop to test the system. If everything goes correctly we will order a stainless steel version of this hoist. We need stainless not because of corrosion but because of the magnetic field inside the cryostat. Deep inside the liquid helium bath is a 15 Tesla superconducting magnet. Any steel in the area wants to head to south into the magnet. When I say Tesla, I don't mean the cars.

Thanks for looking.

Saturday, January 26, 2013

Space Colony Tool Loadout

Does anybody out there remember the movie with Sean Connery called Outland? He plays a future cop on one of the industrialized mining moons of Jupiter. If you haven't seen the movie its pretty good. Its also what my mental picture of the distant future of space travel once it moves out of the scientific and into the industrial. Once companies figure out how to make a profit on another planet it will become a reality.

Its been quite a while since I've seen the movie but I have been thinking about what tools I would want to have with me if I moved to a different country, or worse a different planet. My first answer would be all of them but that really isn't practical because I would need an ocean container to haul it all in.

As a fun mental exercise I started to imagine what tools I would take if I was leaving earth and going to colonize another planet. It turns out there are all kinds of what if questions that come up so I had to set some basic rules to help define the problem and scope.

 The following description sets the stage for the basic tools of the colonization mission.

You are part of a team of explorers sent on a one way trip to colonize a distant habitable planet. The information available on the target planet is limited. We know the basics. The temperature, atmospheric composition, gravity, radiation, land masses, oceans. And we also know it harbors carbon based lower life forms of plants and animals. All of the data we have is from long range high speed probes that surveyed the system from orbit. Unfortunately we don't have any hard surface data because of the limited sensor capability of the fast probes. Our best guess from the available data is the target planets are very earth like but without any other higher humanoid life forms.

This is a one way mission. There is no fuel and stores for any type of return flight. We anticipate enough fuel on arrival to survey two of the most likely planets in the extrasolar system for the colonization team to make a final site decision. Re-supply of any sort will not be possible. The spacecraft itself is approximately the mass and composition of a semi truck and trailer. All of the materials of the spacecraft are available for recycling and use for the colonization at the discretion of the crew. Communication with earth will be possible for one year after the spacecraft lands. However any signal will take a month to reach the earth and a month to come back. In other words the spacecraft will have computer, electrical power and communication for one year. After that the colonization team is on its own. Forever. No McMaster, no Craigslist, its Sink or swim.

As the sole representative for the skilled trades on this colonization mission you have been given the responsibility to recommend and pack the tool kit for the mission. Space and weight are severely limited. All available space is dedicated to fuel and food stores for the crew. The allotted weight and volume for the toolkit are 10kg and 60 liters volume maximum. Approximately 22lbs and roughly the volume of two five gallon buckets. The requirements for the toolkit are that it must have the capability to service and maintain the spacecraft during the interplanetary flight and be useful for the establishment of a colony on the planet surface. You have less than two weeks to choose and pack the kit for the flight.
 As you can see the tool choices we make are pretty important. This is the type of thought exercise that NASA could spend half a million dollars on just defining the color of the toolbox.

Is this realistic? Not really. The ship would have at the very least a way to produce energy either solar or nuclear to power the computers and other equipment aboard. However it doesn't make as good a story if the ship will sustain the colonists for a long period of time. I would much rather think about taking a spacecraft apart with my tool kit and building all kinds of things from the materials. I can't take a chainsaw and a cutting torch so I will have to make due with some good hand tools and elbow grease.

My first thoughts are centered around general tool making. I expect to find raw materials on the planet but I don't have much information on what to expect. I'm not going to pack a blast furnace and a rolling mill so I will need to figure out a generic enough set to get me going no matter what I find. The first and easiest source of materials will be the space craft itself. It will probably be a shelter initially but will eventually be consumed to make to make tools and machines we will need to process the available raw materials on the planet. 

Twenty two pounds is not much of a tool kit for the rest of your life. If you think about it everything we have today comes from the guys that learned how to make stone tools so theoretically we don't need anything. Those ancient tool makers are the beginning of human tool making history. We could start again from square one with stone tools but with our knowledge and source of high grade raw materials from the space craft our new civilization has a major head start. It also makes a better article to read.

So I started a list of tools, gathered them up and weighed them. Right away I see that the volume is not the problem but the weight is. Anybody knows who has picked up a working persons tool box that tools are heavy. I chose tools that I thought have multiple uses. Tools that have too many functions usually don't do any of the functions very well. The example I use is the knives they had for camping that had everything on them including a fork and a spoon. They really didn't do anything very well. Better to distribute that weight over a couple of single or dual purpose tools that perform well. Since I could only choose what I have in the shop we will have to make some assumptions about how much each tool could be optimized for the trip.

Toms list of tools for trip. Not in any order of preference.
  1. Tongue and groove pliers. (Channelocks) These are general purpose pliers that fill a wide range of holding and turning jobs.
  2. Vise Grip pliers. Curved jaw with wire cutter. Clamping pliers useful for holding and clamping.
  3. Four way screwdriver. Has two sizes of both phillips and flat blade drivers.
  4. Pipe wrench 14 inch aluminum. I didn't have an aluminum one to weigh so I estimated it at one third of the weight of a standard steel model. Heavy duty turning and holding tool.
  5. Hammer. Initially I chose a ball pein but when is the last time you used the ball end? I switched this to a claw hammer which is more versatile.
  6. Adjustable wrench six inch. Can't go anywhere without an adjustable wrench. 
  7. Diagonal cutters. I seem to use these all the time. Wire cutting, nail pulling, crimping, etc.
  8. Multi tool. I have a SOG brand tool with a long list of accessories.These particular ones have a needle nose pliers in them.
  9. Tweezers. Try getting an alien out of your finger without them.
  10. Allen wrenches. I usually hate the folding hex key type but they are lighter and not as easy to loose an individual wrench in the dirt.
  11. Electrical multimeter. Mine is heavy at 1.3 lbs. I'm guessing this could be reduced by a factor of ten with a smaller lighter model.
  12. Hacksaw. Cuts almost any metal and or wood.
  13. Jab saw. 
  14. Coping saw. 
  15. Tungsten carbide grit hacksaw blade. Flat and wire type. Now I can cut hardened steel and other tough materials.
  16. EMT scissors. These will cut sheetmetal and a variety of other thin materials.
  17. Diamond abrasive sticks.
  18. Half round file.
  19. Flat file
  20. Round file.
  21. Combination square set. This fills a couple of needs. I get a good right angle reference, a level, an accurate length standard, and an angle standard.
  22. 12 ft tape measure. 
  23. Pocket reference book. I can remember a lot but not all this useful stuff.
  24.  Large locking blade knife. May have to process some of those tasty off world animals while were there.
  25. Hemostat clamp.
  26. Cold Chisel
  27. Dividers
  28. Small sharpening stone.
  29. Magnifier.
  30. Small screwdriver set. Jewelers type.
  31. Two or three foot length of band saw blade. 3/4 wide coarse pitch. This is to make a bow saw out of to help process wood or whatever plant based building materials we find.
So far what I have listed is a little over fifteen pounds and easily fits in one of the buckets.
 I subtracted the weight advantage I would gain from going to an aluminum pipe wrench and a small compact multimeter. I still have seven pounds allotment left and six or seven gallons volume left. As I looked at the growing pile of tools I started thinking about reference standards. A new civilization would need to establish standards for weights and measures as well as time. These standards would be helpful to measure and modify our new environment. But since its my choice I decided to add more tools and leave the scientific stuff to the scientists.

What other multi use tools should I add? I was thinking about some force multipliers like a screw or hydraulic jack, or a prybar of some sort. Some useful additions might be,
  • Socket wrench set. 
  • Torx wrenches
  • Needle files
  • Soldering Iron. What fuel source? Electric on the ship but its dead weight after that.
  • Mirror
  • Drill bits
  • Hand crank drill or brace
  • Wood Chisel
  • Pin punches
  • Tapered Drift punch
  • Sewing needles
  • Lightweight come along 
  • Magnet
  • Magnesium Fire starter.
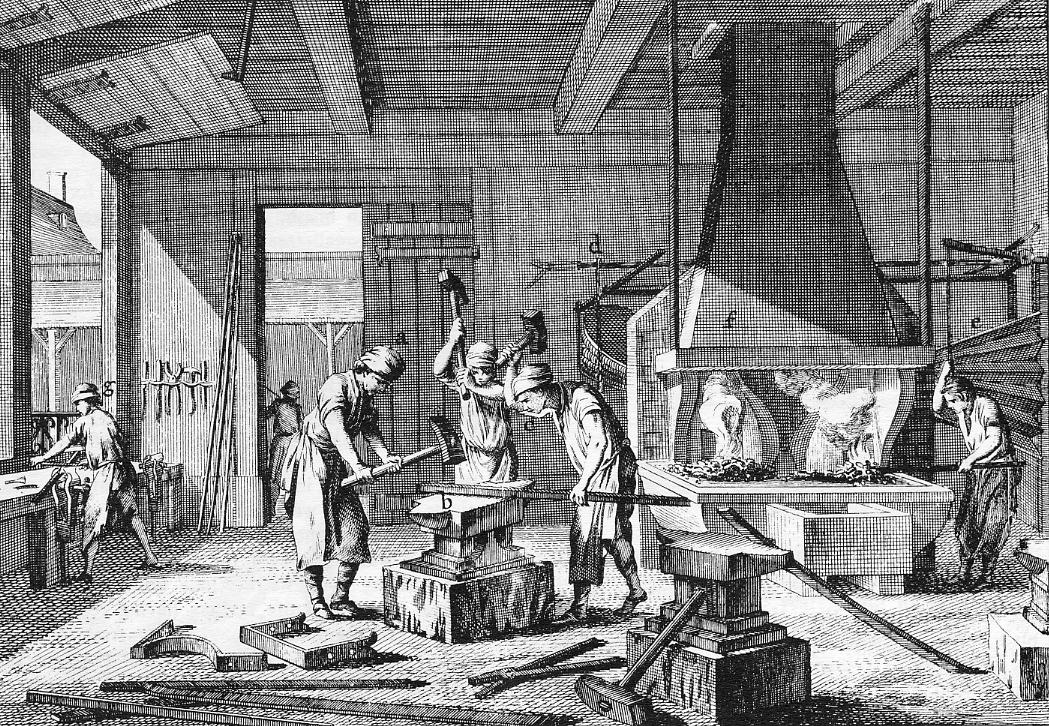
What I imagine as the most versatile setup would be what you might have found at a country blacksmiths shop back in the early nineteenth century. These guys were the local toolmakers before electricity and huge manufacturing took over. All they needed were some hammers, a source of heat and a decent source of fuel to work. The tools of the general blacksmith could re-process many of the materials of the spacecraft into additional tools and articles for the colonization. These guys were the ultimate early recyclers. I can imagine that some heavy part of the spacecraft could function as an anvil for the new town blacksmith. We do know there are plants and organic matter on the destination planet so these might function as fuel for the forge.  
An early colonial blacksmiths shop. With a similarly equipped shop we could make short work out of the spacecraft. What would be our tool need priority? If we plan on using the spacecraft to build our colony I would say that shelters of some sort would be the highest priority for the colonists. We are pretty sure there are plants on the destination planets so cutting down trees and making durable shelters might be high on the list. Or perhaps boats or wheeled carts for exploring the planet surface more efficiently. 

Doing some internet searches I looked at some tool kits for people traveling off the beaten path. The key common element is self sufficiency. I was happy to see that some of these guys agree with my selections. Open ocean sailors, back country off roaders, and astronauts all seem to pack a similar kit. 
 Toolkit for the Apollo space mission. Great minds think alike. See the 10 inch adjustable wrench. I bet the Crescent company fell all over itself to make sure its wrench was on the mission. This kit sold at auction recently for $76,000. Check out the cool blue handled ratchet at the bottom. It has an oversize thumb lever so it can be operated with spacesuit gloves on.

I wanted to get some other peoples opinions So I showed my off world tool loadout to my wife and Jeff from MLS After explaining the basic idea and general rules they both ripped into my tool selections like a couple of wood chippers.I admit I didn't have a leg to stand on with the dividers.......
Here are the tools they wanted out of the kit. This reduced the overall weight considerably. They chose to add it back and then some with the addition of a heavier hammer, a larger 10inch adjustable wrench, and a sharpie. They gave me crap about the magnifying loupe. My comeback was that they would be crying like babies when they got a metal sliver in their hand and I was the only one with a magnifier and some tweezers. 
When I mentioned that the colonists would be dismantling the spaceship a pry bar, drill bits and a better pair of snips quickly got on the list.
Here's where were at after the suggestions. Total weight is almost seventeen pounds. This leaves about five pounds we can add.

There are many other things I would want along on a trip like this but they fall under the heading of consumables. Things like cord and wire, zip ties, duct tape deck screws, nails etc all fall under this heading. For the purpose of this thought exercise lets stick to durable tools or at least ones that can be sharpened and reconditioned.

After my wife and Jeff added their choices to the load out we now have some drill bits. We could add one of the old school brace type drill drivers.
This gives us a head start with hole making. Incidentally hole making is the most common machining operation of all machining operations so I'm sure it will be in the new world. I also hate the thought of having to make my own drill bits from some piece of space junk so I was happy to see them added to the kit. Guessing at the weight of this I'll say something like 2.5 lbs.

So my additions to top off the kit are, brace bit driver, one inch wide wood chisel, needle files, larger selection of drill bits, a mirror, and a magnet. Obviously we could custom make most of these tools and loose more weight but how much? It all related to how much time you have to spend optimizing. Even the Apollo guys opted for a few off the shelf commercial items and its a safe bet they had more than two weeks to decide what to take.
So I think I'm ready to load up and head to the job site unless you have some suggestions for improving the kit. I'm right at 22 lbs total for everything on the scale and in front of it. Lots of volume left. This all fits comfortably in one of the buckets. I might add a foam pad to kneel on and a couple of pairs of the magic gloves. Not much weight and pretty damn useful.

Post a comment if you think you have a worthy improvement. Thanks for looking.

Tuesday, January 22, 2013

Bay School Engineering Shop Tour

Last weekend I met a good friend of mine for lunch. Brad runs the engineering design program for the Bay School located out in the absolutely scenic Presidio in San Francisco. In the last two years Brad has taken a bare bones building and put together an impressive hands on workshop to teach engineering design and robotics to high school students. I have had the pleasure of knowing Brad for almost ten years now. We started our friendship working at an engineering job shop that I managed in Pleasanton. These kids will definitely benefit from his years of hands on experience.

It does me good to see programs like this being created and run by people with real industrial experience. I often worry that the US is moving away from our roots as a innovative manufacturing leader. The Bay school and Brad recognize the need to train the future engineers in the hands on part of an engineering career. They are putting their money were their mouths are by setting up a first class workshop. With these kinds of programs we help move the economy ever so slightly away from finance based toward innovation and high tech manufacturing.

When Brad was tapped to head up this budding program there was no shop space. From a rickety historic building he brought together the equipment and resources to create the entire engineering design and robotics programs from the ground up. I remember this period well. I wouldn't hear from him for weeks on end then a flurry of emails on some technical detail on some shop infrastructure item. I can say he has done a fine job. After more than a year I finally managed to get out to see the new shop and see some of the things the students are working on.

A brief history of the building where the engineering shop is located.
The crispy before picture of the building. They were not allowed to modify the exterior of the building because of historical preservation rules at the Presidio.
An interior view during the construction. The building is two levels with the engineering shop on the ground floor and an multi use space on the second floor where printmaking, wood crafts and painting are taught.
Here is a shot of the shop before the machinery was moved in. Brad doesn't like the columns but I do.
Brightly lit and organized just like a shop should be. Currently they have a lathe and a milling machine with plans to add a sheet metal capability. The big screed TV is the digital readout for the lathe. Just kidding.
This pretty much sums up the teaching method in the shop. The students are encouraged to try things out and learn from the experience. The projects range from civil engineering studies of bridge construction to robotics.
 A bridge truss study in done in pasta. This one failed at something like 200 times its own weight. And when your done you can make a snack.
I thought I had a cool office. Looking out the window of Brads office is a 155mm howitzer. This is some kind of gig, all the teachers at the Bay school are issued a laptop and an espresso machine. And yes it makes excellent espresso.
One of the benefits of having your school on the grounds of a national park, your own personal howitzer. 
Not a bad view from one of the upper levels of the school. This happens to be the teachers lounge where no students are allowed. I wonder why they put the lounge up here?
 I wish I had a window like this near some of the lathes Ive had to run. I just hope nobody whips a part out of the chuck and sends it through the window.
Here is an idea I haven't seen before. With a small lathe instead of changing the jaws around for OD or ID work just invest in a second chuck. On smaller machines the chucks are not that expensive and can be removed quickly, at least more quickly than you can swap master jaws. You wouldn't do this with a twelve inch chuck but with the smaller ones it makes some sense.
The shop started with one manual milling machine. Notice the phase converter on the floor. These old military building didn't come with three phase power which kind of surprised me for a military installation. I really like the natural light coming through the window. We had a mill near a window like this years ago. One time we were doing some very precision boring on that particular machine. The sun shining through the window was enough to heat the machine casting enough to affect the work. We had to block off the window for that particular job.
Brad had to work within a budget when he was putting the shop together. He found these heavy duty kitchen tables at Ikea that he re-purposed into serviceable shop benches. For the life of me I cant find these on the site but Brad assures me they came from there. The benches are solid wood not pressed board.

 With a few additions to the equipment list Brad will really have a first class shop helping to turn inquisitive kids into the future engineers and scientists that will hopefully keep innovation and manufacturing here at home where it belongs.

Thanks for looking.

Sunday, January 20, 2013

Cast Iron Rotisserie Repair

My neighbor brought over a fancy antique cast iron nail dispenser the other day. This is the guy that travels to France a couple of times a year and comes back with a container full of eclectic and mostly broken items. This particular piece got dropped or damaged in shipment and snapped off part of the casting. Fortunately for my neighbor he lives across the street from a machine and welding shop. This is where I come in.
Here is the dispenser as he brought it over. You can see the pedestal is snapped off and whatever was sticking up is missing. A new one needs to be created.
Classic cast iron fracture. There was a tiny radius at the root of the shaft but the fracture started on a score line from machining. The boss was cast into the base so I don't really know how much material I have to work with through the stem.
The first minor challenge was determining what the thread in the top finial was. Automatically I assumed it would be metric because of the country of origin. After fussing around for a while it turns out the closest match was 5/8-18. This is pretty close to M16 x 1.5 so I really looked at it closely. The bore on the compartmented casting would not accept 16mm so it was confusing for a minute. The thread was also pretty chewy looking down the bore. My 18 TPI thread gage fit better than the 1.5mm so 5/8-18 it is.
The casting is pretty interesting. I will give my neighbor credit he has a pretty good eye. Not something I would buy but I can appreciate the workmanship.
Nothing ever goes as smoothly as you see it in your mind. The four jaw will not close done far enough to hold a 5/8 diameter so I decided to remove the four jaw chuck and put the 5C collet closer on the machine. One bonus was at least I had a 5/8 collet on hand this time. The chuck removal took longer than it normally would. I decided to make a spud to clamp in the chuck jaws to help with removal. At the same time I also needed to put some decent index marks on the camlock locking screws. For some reason the spindle nose didn't have any index marks from the factory. After the chuck removal delay I cut the thread on the finial end of the new shaft using the finial itself as my thread gage. This is the first time I have threaded with the new lathe and I'm happy to report it works great. Some lathes have a little trouble when you engage the half nuts but the Yam seems to slide right into the leadscrew without any bumps or jams.
Before I did any threading on the opposite end of the replacement shaft I wanted to see what thickness was I would have to work with. The base casting is fairly light so I was worried that the thickness through the neck was marginal. This is a perfect job for the mini strap clamps and base plate.
I really wanted to avoid putting any clamping pressure on the casting across the diameter. Holding it down was the only real option. The little 10-32 strap clamps can put serious pressure if needed. I indicated the OD of the neck instead of the broken spud. There was a slight visual mismatch between the broken spud and the OD. Because I wanted the two diameters to be concentric I indexed on the OD.
Fist step was to flatten the broken area so I could  get a drill started. I poked through with a small drill to see what the thickness was. It looked like I would have enough for a decent sized stud to attach the new shaft.
I was able to get a 3/8-16 through the neck with plenty of meat. Instead of single pointing the 3/8-16 I just tapped the new spud shaft the same and bottomed a nice strong set screw in the new shaft.
The set screw is 150kpsi strength and I get good full threads all the way up to the shoulder.
The new spud shaft. This is one French antique that has been thoroughly Americanized. Time to assemble the dispenser.
I left it in the machine to tighten the spud shaft into the base. I used my copper jawed vise grips to secure it.
These are one of the best homemade tools I have made. The copper jaws are silver brazed onto the smoothed down stock vise grip jaws. This is the second set I have made because they get so much use. It grips the shaft better than a strap wrench and leaves no chowder marks.
Final tightening of the finial. No tools just hand tight with the secret gloves.
Done. I imagine some wealthy yuppy will have this in the hallway filled with keys or candies. It would also make a nice paper clip and thumbtack holder. I know, it would be an awesome baked potato prep station. You could have all the condiments in the pockets, sour cream, bacon bits, green onions and the potato being prepared in the finial cup.

A fun little Sunday afternoon repair job. Thanks for looking.