The lathe is a simple four wire setup, three phases and a ground, no neutral leg. The stock electrical box on the lathe is not much to write home about. I had to punch a hole in the box for the cord strain relief. The plug and receptacle I scrounged is actually a five wire three phase plug which means it has three phases, a neutral and a ground. Its overkill but really a good setup with the dedicated ground and neutral and the price was right. The machine didn't require a neutral leg but since I only want to pull wire once I went ahead and pulled five wires up to the receptacle. There is some confusion as to which legs of the three phases go to which terminals of the receptacle and plug. They are labeled X,Y,Z,W. I consulted my electrical buddies that do this stuff for a living and asked what the convention in industry is. Thanks Anne and Tom. I try to do things like this in a Journeyman like way that way if any of them comes over they don't give me a hard time because I Bozoed the job with some rookie mistake. The convention is phase ABC, goes to XYZ on the plug. If you use a neutral that lug is typically W and very distinctive with a silver screw and silver male prong of the plug.
With this five wire plug the center pin is the ground. The silver dog leg prong is the neutral. The goal is to do as much work as possible before you kill the power and work in the dark. I was able to safely remove the existing milling machine circuit from the conduit without shutting down the entire bay because I was working on the dead side of the open breaker. After removing the wires from the breaker I taped the ends so they couldn't make contact with the panel in any way and was able to push the wires toward the far end. I needed to remove the wires so I could cut the conduit mid run and install a pull box and a receptacle box. This is in no way an endorsement to work on live electrical circuits. Best practice is to shut all power down and lock out the power source so you don't get killed.
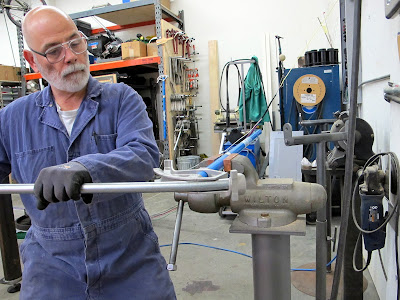
I had to add some kick to the conduit to mate with the new boxes. I actually like bending conduit for some reason. I guess it appeals to my fabrication roots. For short pieces and small bends I like to put the conduit bender in the vise instead of crawling around on the floor.
I think its easier to see what your doing than bent over and trying to eyeball the angle lines on the side of the bender. These are just little offset bends so the conduit meets the box properly.
All flaked out and ready to pull. These are five wires for the new lathe circuit plus the original four wires for the milling machine.
Time to kill the power and pull some wire. My wife helped with the pulling. Since the power was down she couldn't work on anything anyway so she fed the wires in as I pulled. While the power was off I also added a ground bus to the panel. The original installer didn't put one in the panel and I had enough ground lugs screwed to the panel in various places that it was time to add one in. This is supposed to be mounted with machine screws so it is bonded to the panel better than if you used self tapping sheetmetal screws which are real tempting.
The wire pull went smoothly partly because I don't mess around with wimpy half inch conduit. The price is basically the same to go to three quarter so why make your job tougher trying to pull through some dinky soda straw.
Fortunately the sun was out and coming through the windows. The headlamp is great for those shadowy areas inside the panel. The next step was to terminate all the wires for both circuits. I spent some extra time in the main panel cleaning up all the grounds and landing them on the new ground bus.
It lives. I even got the rotation correct. I am now lathe capable in the shop. The YAM still needs more cleaning and and a back splash then I'm really cooking with gas. In this shot you can see the elevator feet I added to the stock leveling screws. This raised the lathe to a good working height and I can slip the pallet jack underneath if I need to move it for some reason. The bonus is I can sweep under it and prevent the inevitable chip buildup under the machine.


Do you happen to have a mnaul with electrical schematic for this unit? I need one for my YAM 1760G.
ReplyDeleteThanks!
Fortunately the sun was out and coming through the windows. The headlamp is great for those shadowy areas inside the panel. The next step was to terminate all the wires for both circuits. I spent some extra time in the main panel cleaning up all the grounds and landing them on the new ground bus.
ReplyDeleteneon shirts in bulk
best place to buy shirts in bulk