Sunday, March 10, 2013

Hamburgers and Telescopes Part 1

For most people their idea of a vacation is to travel to a different place with friends, relax and take in some sights, and eat a few good meals. If that is the definition of a vacation then I guess this week long trip to southern California qualifies.

I have a good friend named Don who asked me to help him with an installation job in southern California. Don is one of those friends that is always there when you need him.  I could call him right now and say I really needed his help and he would drop what he was doing and load up and be here in a few hours. He is one of those friends that you cant let down. He would never hold it against you if you couldn't make it but you better be almost dead if you wimp out or you will never hear the end of it.

A couple of months ago Don helped me move the engine lathe I bought using his heavy duty truck and trailer. The scales had definitely tipped in his favor so I was really on the owing side of the fence.When he asked for my help with this project I jumped at the chance to help out. Actually I would have helped him regardless. The installation was interesting to me technically and a great opportunity get out of town for a while with some friends.

Don has been building telescope enclosures for the :Las Cumbres Observatory telescope network. He built one of the first prototype clam shell Aqawan enclosures three years ago and has building them for LCOGT ever since. Ultimately the non profit company wants to link an array of telescopes positioned all over the world and allow professional astronomers and citizen scientists to schedule time on the instruments. Most of the intended locations are remote and require the instruments to be protected from the weather by a remote controlled enclosure like the one below. Pretty nerdy stuff for a guy that is normally a cow puncher.
The Aqawan's have a tubular steel frame and two interlocking clam shell roof sections. The roof sections are driven by two 24v gear motors. Connections to the roof sections is by roller chain. Interestingly they are not counterbalanced at all other than to keep the chain tensioned. The corner of the enclosure that runs on the top edge of the wall rolls on a vee groove track roller.

My part in the story was volunteering to assist my friend Don with an installation on the top of a building in southern California. A group of Caltech planet hunting astronomers are developing the next generation of detection instruments to find earth size planets by measuring tiny wobbles in distant stars. Ultimately the enclosure we installed at Caltech will be moved to a mountaintop in Arizona.

This adventure all started on a Sunday morning with loading the trailers with all the various Aqawan parts and tools. But first there were a couple of machining details to clear up.
This is Don's milling machine. Its actually an old Atlantic jig borer. He bought it from my old toolmaker friend Charlie that I have mentioned here on the blog. Its actually a nice little machine. My first task was to make some shackle plates for the trailer. This was more of a self preservation move on my part. After my last go around with these worn out heavily used trailers I jumped at the chance to save some road side repairs.
I just used a square scribed the hole centers and drilled them. Not very exciting as far as the machining world goes. I couldn't find a single scriber in the shop so I improvised and sharpened a drywall screw. I found a bunch of horseshoe nails but they aren't very hard.
It actually worked pretty well. These screws are pretty hard so it easily scratched steel. I'm sure it will be on the welding table the next time I visit.
The next assignment was to modify a couple of Aqawan parts to accept retaining roll pins. These are stops that are spring loaded that the enclosures halves close on. Normally I would never put an end mill in a nice Albrecht drill  chuck but what the heck I'm on vacation why fight it. I'm going with the flow on this adventure.
We were ready to load the wall and clam shells sections onto the trailers. Don fired up the farm "forklift" and we rigged the sections up for lifting.
One of the wall sections of the Aqawan being moved out of the barn, I mean shop. We wanted the wall sections to stay vertical during transport to make the erection and unloading easier at the job site.
We managed to get everything loaded before dark. There were a few details to take care of in the morning before we shoved off the dock.

One of the important details was to install the new shackle plates I made the day before. The old ones were so worn the holes looked like slots.
After changing the plates we were off. I takes an hour to get from the remote site of the shop to the freeway. With trailers we were limited to less than sixty miles per hour. Its a long drive to LA at fifty five or sixty.
Its an even longer drive if you have to stop to repair the trailer along the way. I was in the truck following the creaky trailer and noticed some tire smoke off the right side when the trailer hit a big bump. We pulled off the road to make a few field expedient modifications.
 This little block of wood saved the day. It lifted the spring just enough with the load on the trailer so the tire didn't rub on the trailer frame. It managed to stay in the whole trip down and back.
The remainder of the road trip was unremarkable other than some crappy fast food. We were able to drop the trailers at the installation site on the Caltech campus late the same night. The observatory dome on top of the building you see in the background is not a telescope but a solar light director called a coelostat . The dome follows the sun all day long and pipes the sunlight throughout the building with fiber optics augmenting the buildings electric lighting. 

This is the big installation day. We have a crane coming this morining to hoist the clamshells and wall sections into position on the building.
Most of this building is below ground. Only about three feet of the building is above grade. It is the isotope handling building where they do some work with radioactive materials. Don had poured the small slab and telescope footings you see in this picture on a previous trip.
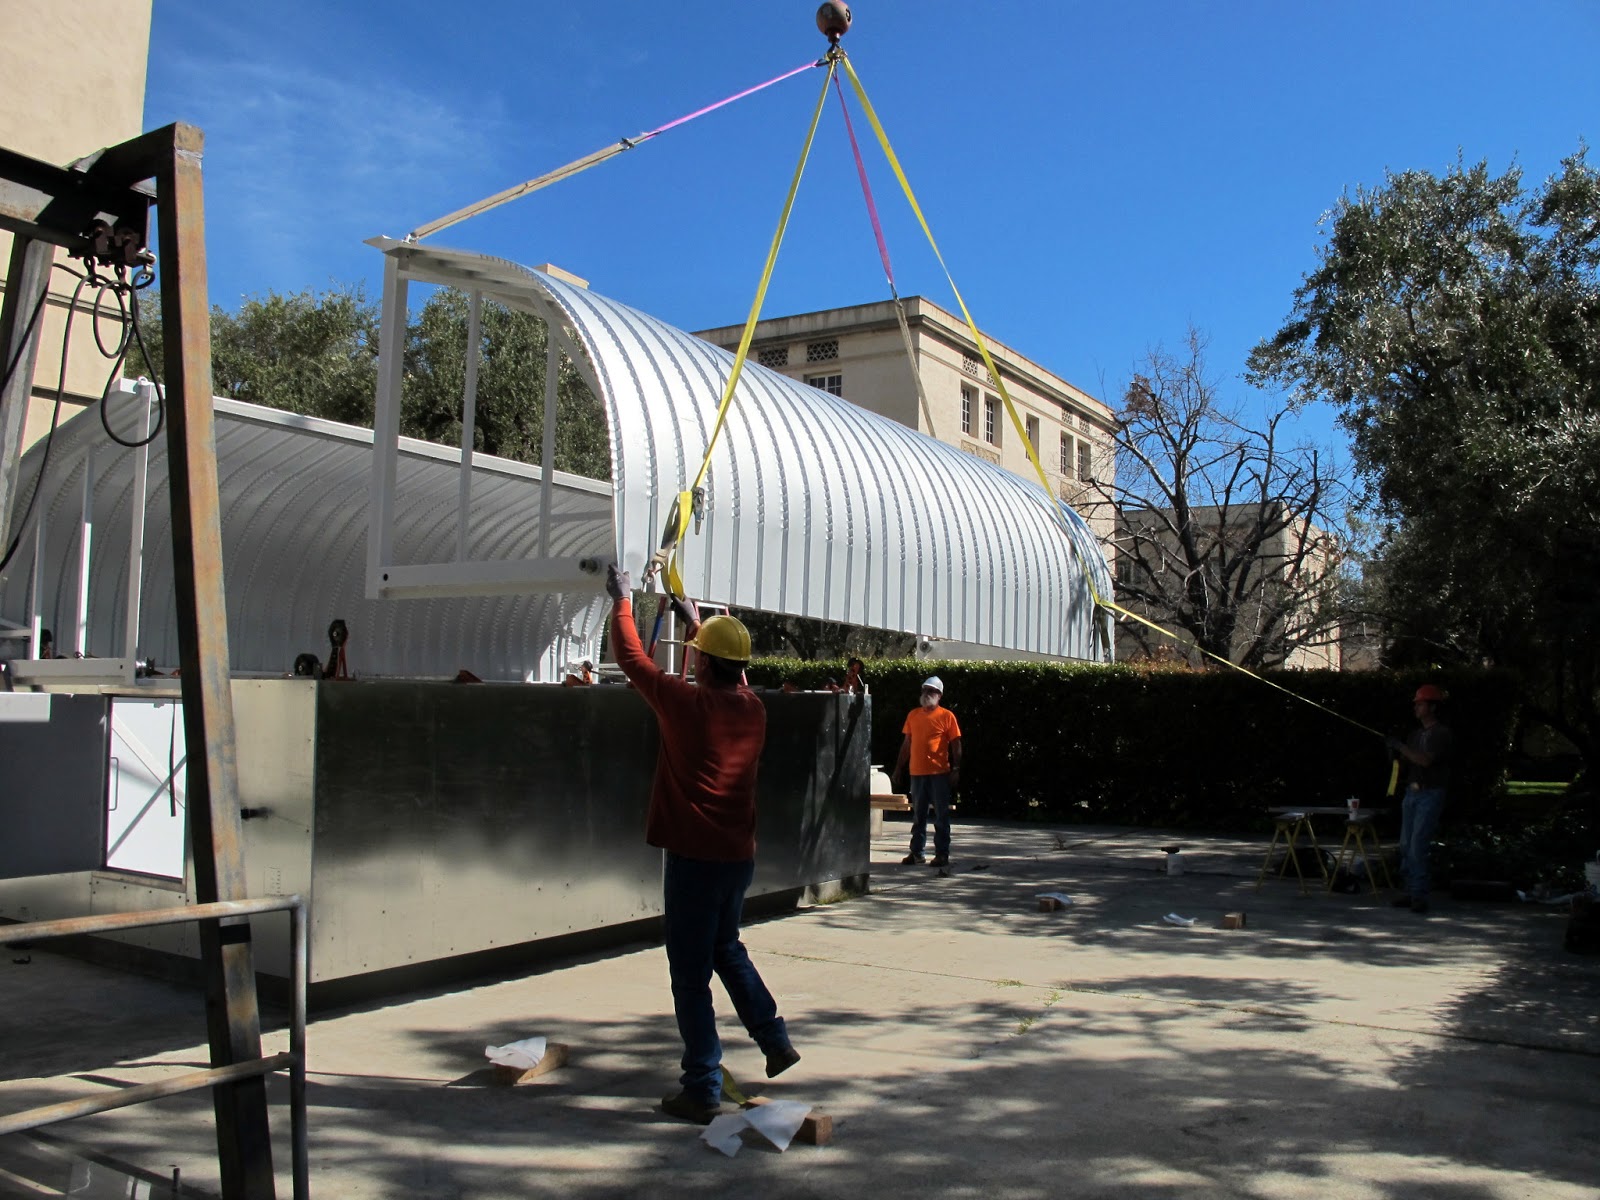
The crane showed up right on time. We jumped right into it rigging up the first set of shells and walls. The trailers are parked behind the trees you see on the sides of the crane. The radius was only about thirty feet but the height we needed to clear the trees was pretty good.
 Shamrock crane sent a neat little five ton rig built on a Ford F-750 chassis. Mike the operator told us he can pick a thousand pounds sixty feet straight out which is fairly impressive. The clamshells and wall sections are fairly light but the crane access was pretty limited.
One of the long wall coming over the pesky tree. We needed to set the walls first and then re-rig the clamshells to install them on the walls.
In this shot were squaring and leveling the walls of the Aqawan. Mike the crane guy is waiting for us to get everything ready for the next lift.
With the walls squared up and level it was easy work to land the walls in place and connect the pivot links. I would hate to think about trying to do this without the crane. I would have been tempted to rent the thing myself it Don hadn't already done it.
Second side. We were able to rig the sections level by adjusting the heavy duty ratchet straps. The pick points were threaded holes with eye bolts.
It only took about three hours from start to finish to get to this point. The boss let us get some lunch after the crane left. The crane was on the clock so we wanted to be done with it as quickly as possible.

We ended up finding a great lunch spot right down the street. How can you go too far wrong with a place called Pie 'n Burger.

Stay tuned for part 2. Thanks for looking.

Tuesday, March 5, 2013

Toyota Tie Down Brackets

My wife asked for my advice the other day on securing something in the bed of the pickup. Since I know more than one knot I get all the pickup related rigging questions. A friend of hers asked for some help with a sheet of plastic. The sheet is for making art Monotypes. Eventually the sheet will be cut down into smaller pieces that will be painted on and run through a press to imprint a one time image on paper.

The problem is getting the sheet home from the plastic supplier. Its too large to fit in a passenger car, and to small to make it worth while to have it delivered. We have a small Toyota Tacoma pickup. It is not what you would expect somebody like me to have with the heavy duty machinery collecting habits you see on the blog. I guess I figured that most of the time I would be driving it around empty running small errands and commuting not really using the pickup part of the vehicle. Why pay for all that gas and tires for something you only use occasionally? Now when I see somebody going to the grocery store in their F-350 diesel 4 x 4 dually I just have to smile. When I need a heavy truck which is not very often I can rent one.

Back to the Toyota. The problem is she needs to transport the sheet of thin plastic in the bed of the Toyota. Its important that it doesn't get scratched or gouged so it cant flop around and most certainly cant blow out of the back. We live on the windy side of a bridge which has a habit of cleaning out the bed of a pickup when you least expect it. The crosswind can pick sheet goods right out of the pickup bed. In their infinite wisdom the engineers at Toyota only equipped the truck with tie down point near the tailgate.
I have run into this problem before. Its been on the list for a while to make or buy some additional clips so materials can be secured near the cab of the pickup. The tie downs along the edge of the bed are pretty wimpy and only suited for tying stuff that sticks up higher than the bed.
Two years ago when we were doing a lot of hauling in the truck I bought these nice brackets that fit the stock cargo rails in the bed. They work great but they don't do anything when you want to haul a sheet of plywood or sheetmetal in the bed. I needed something that I could pull down against just like the two near the tailgate.
Here is what Toyota gives you to work with. Of course my torx bits don't go large enough to loosen the big bolt holding the bed to the truck. I'm going out on a limb here and guessing I won't need this bit very much so I heading to Harbor Freight for a one time tool.
Here are the brackets I made up. I hate to paint anything so I made them out of stainless steel. The large keyhole is so I don't have to take the bolt all the way out of the bed and risk loosing any alignment. Looking underneath the bolt is about three inches longer than it needs to be. This worried me that it might be long to make any misalignment's easier to deal with on the assembly line. The large part of the hole fits over the head of the bolt.
Armed with the new huge torx bit and a couple of brackets I'm ready to install them. The foam pad is for my old man knees in the bed of the pickup. I'm a little worried that these large bolts are torqued to the moon by some automated installation impact driver. I looked up the torx driver specifications and the T55 is rated to almost 200 lb/ft. No wonder it comes on a 1/2 inch drive.
Well that was easy. The bolts weren't super tight and my holes were sized well. It took all of five minutes to put them in. My wife is supposed to pick up the plastic sheet later in the week so I'm sure I'll hear how it goes.

Thanks for looking.

Saturday, March 2, 2013

English Wheel Build

I was looking through some old pictures and I ran across a group that I took when I built my large English wheel. For those of you that are not familiar with this tool it is a manually operated old school sheet metal shaping machine.Typically English wheels are used to make compound curves like you would see on car and airplane bodies These versatile machines can also make a variety of straight bends with simple tooling that is easily fabricated in the shop. Sorry for the low quality pictures. This project was done around 2001 and I had a low quality digital camera.
Like most useful skills and occupations English wheels take some time and dedication to master. I would not call the English wheel a money making machine. This is one of the reasons you don't see many of these in fab shops. The high level of operator skill and slow forming speed limit the productivity in a job shop. English wheels are found in high end auto restoration shops and one man operations that can afford to put the time in required to master and use these specialized machines.

All that said I still wanted to have one to learn the art of compound metal shaping. Most industrious folks make their own wheels so why should I be any different. I started out with testing other peoples wheels and discovering what features I liked and didn't like.

A little background in how one of these machines works is probably in order. There is quite a bit of bad information on the web related to English wheels so I recommend you do your own independent research to help filter the garbage out. Good sources of information are the metal shaping forums that have been around for a while like Metalmeet and Metalshapers.

There are as many methods for shaping sheetmetal as there are people teaching classes on how to do it. There is no doubt that they all get excellent results with their different methods and tools. I would caution you to observe and judge for yourself when somebody tells you there is only one right way to do something. You will quickly discover there are "Wheel People" and "Hammer People" Come to your own conclusions to where you find yourself.

An English wheel is just a glorified giant c-clamp. In fact here is a picture of a small English wheel made from a c-clamp.It works fine. I have driven this one myself at a get together of metalshapers I hosted in the shop I ran.
 The frame just provides a convenient place to mount the two wheels in relation to one another. The wheels are the important part of the machine. Typically a standard English wheel is set up with a large diameter flat faced upper wheel and several easily interchangeable smaller diameter lower wheels.
Rectangular tubing is easy to fabricate into a English wheel frame. Here is a shot of the frame for my wheel during construction.
Upper Wheels.
There is a wide range of wheel diameters and widths found in popular English wheel construction. The most important factors for good results are large diameter, 3x or 4x the lower wheel diameter, minimal runout better than .005 TIR, flat highly polished face, and hopefully hardened to maintain the fine finish. Excellent results can be achieved with less than these minimums but at the expense of greater operator skill and knowledge. Re-machined large diameter casters and large ball or roller bearings are excellent candidates for English wheel upper wheels.
An picture of my friend Wray Schelin's English wheel with a large ball bearing upper wheel. He is working a piece of bronze for an art project demonstration. The advantage of the bearing as an upper wheel are inherent precision, surface finish, and high surface hardness. The face of the upper wheel is typically in contact with the exterior surface of the material being shaped. If the contact surface is not smooth it will imprint its surface finish on the work like a copy machine. Likewise if the upper wheel has a mirror finish it will also impart that high quality finish onto the surface of the shaped material.
When I built my wheel I decided to fabricate the upper wheel from scratch. My primary goal was low inertial weight. It was fabricated from flat material rolled up and welded together. Having a low inertial weight pays back when you are operating the machine. Your arms and back have to stop the wheel at the end of each stroke and re-start it in the opposite direction. When I test drove a wheel with a solid upper wheel the inertia was quite noticeable as well as the fatigue.
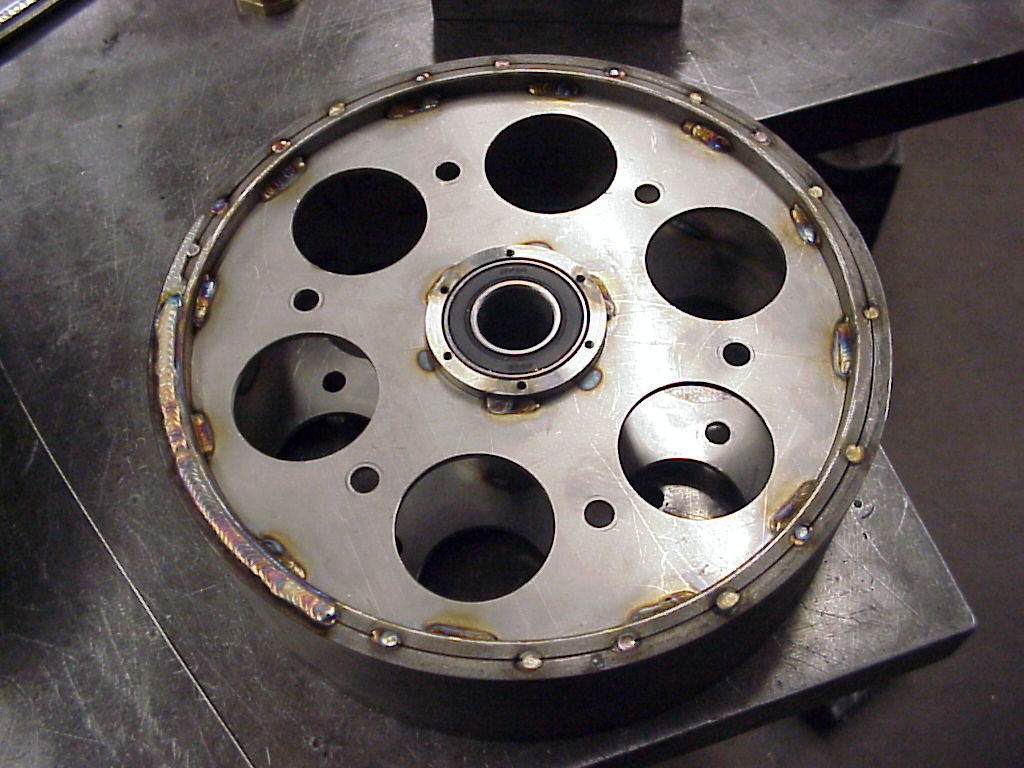
The wheel material is 17-4 PH stainless steel. The outer rim is two layers .25 thick welded together. Side plates are 10 ga 304.
The finish machined upper wheel. It was turned between centers off the bearing bores to get the best concentricity.

Lower Wheels/Anvils.
Making the lower anvil wheels is more involved. They are relieved to allow the sheet to curve downward. Contrary to some popular belief this curve does not do any part of the forming operation. It is merely clearance for the curved sheet. The secret is the center flat of the lower anvil. The flats vary in width and are what does the actual forming of the sheet.

Think of a tire running down a muddy road. The tire displaces or stretches the mud and pushes it out the sides. This is exactly what is happening with an English wheel. The metal is displaced at right angles to the direction of rolling by the squeeze between the upper and lower flats. A rolling linear hammer is another way to think about how the English wheeling process works.
  You can see in this picture that the material is just touching in the center where the flat is on the lower anvil. The side relief curvature on the lower anvil just provides a place for the material to flow. The curve also provides some support to the sheet for keeping it level during the wheeling strokes. The contact patch is theoretically a line but in reality similar to a tire contact patch which is more elliptical.
Here is a selection of lower anvils. The differences are the flat widths and the amount of relief. Typically an anvil with a relief slightly tighter than the desired curvature is chosen. To avoid putting tracking marks in the sheet the process might proceed incrementally using anvils with greater amounts of relief as the sheet becomes more curved.

There are several ways to make lower anvils for an English wheel. If you have a CNC lathe the process is simple. I have generally used the manual step turning technique to make all of the lower anvil wheels for my E-wheel. Step turning can either be done following a template or by calculating the coordinates of each cut on the diameter. If you have a simple electronic drafting program its easy work to figure out the coordinates of the cuts along a curve.
Here is a typical lower anvil. The amount of relief or drop is 3/8 inch. The actual radius is irrelevant. What is important are the transitions between the center flat and the relief. These need to flow into each other with near perfect tangency or else the mismatch will show up in the formed sheet as unwanted tracking lines.
  In this picture the relief has been divided up into a series of cuts that are .050 diameter reduction. The step increment can be anything you want. The smaller the increment the easier the steps are to blend into a smooth curve.
In this picture the end points of the steps are dimensioned to where they intersect the relief curve on the anvil.
One half of a large lower anvil for my friend Wray. He provided a template for the curve that he wanted. I calculated the cuts to produce the curve and match the template.
You can see in this picture that the corners of the cuts all touch the template.
Partway through the blending process. If the steps are small then there is very little material to be removed to fair the curve.
 In this picture the curves are fully faired but not polished. Wray wanted to do the important flat to relief transition himself.

The last ingredient to an English wheel is a way to control the relationship between the two wheels. This is where I see lots of different ideas. The design requirements are simple. The wheels need to be brought together in a controlled and repeatable way. There should be some provision to adjust either wheel so the flats can be brought into accurate parallelism. You cannot rely on precision frame fabrication to provide the necessary accuracy. The relationship between the two flats varies with pressure and frame stiffness so some type of adjustment is needed to maintain parallel flats.
I used a simple flexure to provide the needed adjustment for parallel flats. This is a picture of an experimental Delrin lower anvil for final smoothing of thin soft sheets.
I chose a threaded upper and lower wheel adjuster and large hand wheel. Having a large range of adjustment is useful for alternate types of tooling for the English wheel. Fine thread screws give the needed resolution of adjustment. Acme screws are not necessary for the light loads encountered on the English wheel. They are much too coarse for and require extra operator effort to use.
 
In this picture you can see both the upper and lower adjusters. The lower has a quick release mechanism to assist in extracting the formed sheet. After using the wheel for a while I found this to be unnecessary. An anti rotation feature is needed to maintain parallelism of the two diameters.
 Anti rotation feature for the top adjuster. Two flats on the moving part of the shaft. Washer material is Aluminum Bronze riding on a stainless steel shaft.

Alternate tooling

The English wheel is not restricted to compound forming. With a little creative thinking and some tooling this machine can do some things that machines costing tens of thousands of dollars would find difficult to produce.
Rubber wheel forming. Unlimited length radius bends can be produced with this technique. The soft upper wheel acts as the die to produce a bend with a radius equal to the lower wheel form. Accurate tracking is important with this technique.
Edge tipping an wiring can be done as well. This is a setup my friend Wray uses for bending narrow flanges either along straight or curved edges.
More tooling for long straight radius bends. Compliments of Wray Schelin.
For some of the ideas seen in the alternate tooling a useful adjustment is the ability to bias the lower anvil position in relation to the upper. In this picture we see a dovetail adjustment that allows the lower anvil to shift in either direction.

So in closing if your thinking about building an English wheel I suggest you test drive one before hand. There are enough of these machines out there that its simple statistics that there will be one near you. All of the guys that I have met in the metal shaping craft have been open and eager to help folks starting out. So don't wait any longer. Get out there and try one. I'm sure you will have fun and meet some interesting people.

Links for additional reading.

Imperial Wheeling Machines

Wray Schelin

Thanks for looking.